Acuvim II Installation Guide
Acuvim II Installation Guide Overview
Voltage and Current Connection
The Acuvim II can be installed using some of the common installation methods shown below along with their respective meter configurations. For other installation methods not mentioned here, please consult the Acuvim II Series Power Meter User Manual.
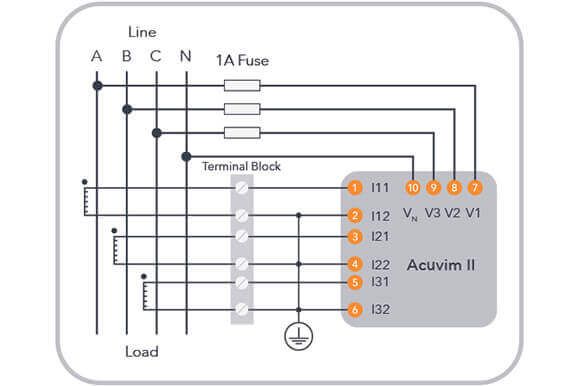
Three Phase: 4 wire-connection (Three-phase with a neutral)
Direct voltage connection is used if the system voltage is lower than 400V LN or 690V LL. The connection diagram is shown in Figure 1.
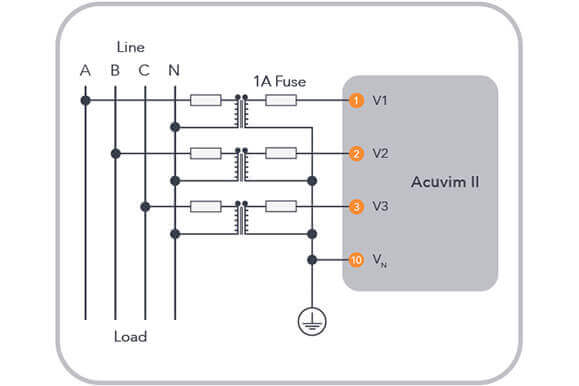
PTs are required if the system voltage is higher than 400V LN or 690V LL. The connection diagram is the same as the direct voltage connection seen in Figure 1, with the exception of the PT connections for the voltage lines. The PTs should be connected as shown in Figure 2.
Three Phase: 3 Wire-Connection (Three-phase without a neutral)
Direct voltage connection is used if the system voltage is lower than 400V LN or 690V LL. The connection diagram is shown in Figure 1.

PTs are required if the system voltage is higher than 400V LN or 690V LL. The connection diagram is the same as the direct voltage connection seen in Figure 1, with the exception of the PT connections for the voltage lines. The PTs should be connected as shown in Figure 2.

Single Phase: 2 Lines (Single phase with one line and a neutral)
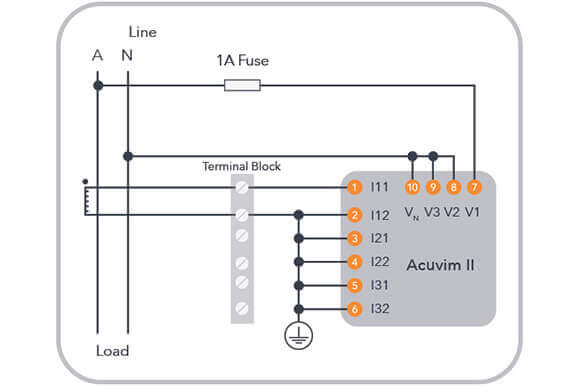
Figure 5: Meter Configuration: 1LN, 1CT (Firmware above 3.01); 3LN, 3CT (Firmware below 3.01)
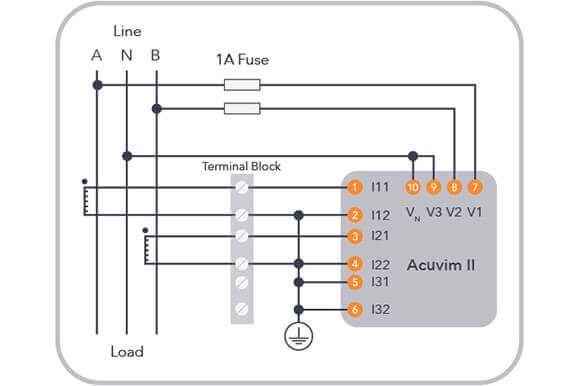
Single Phase: 3 Lines (Single phase with 2 lines and a neutral)
Power Supply Connection
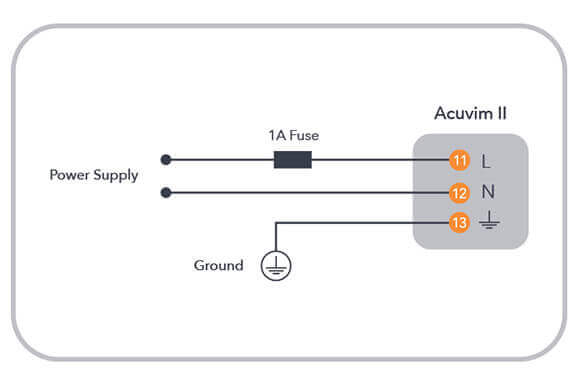
This will be connected based on the two power supply options available:
- The standard option: 100-415Vac, 50/60Hz or 100-300Vdc
- The low voltage DC option: 20-60Vdc
Related Articles
AcuCT Flex CT Installation Guide
AcuCT Flex Installation Guide Overview Detailing the installation of AcuCT Flex series of flexible current transformers in a number of configurations. Key Symbols AcuCT Flex Warnings Warning: Disconnect power supply before making electrical ...Create Calculated Meter for DI Counter on AcuRev 2100
AcuCloud – Creating Calculated Meter for DI Counter on AcuRev 2100 This document provides users with a walkthrough on how to create a calculated meter on AcuCloud to represent the DI counter for the AcuRev 2100 meter. Users will need to have an ...How to download Trendlog Managment data
How to download meters data using Trend log Management The Trend log management allows users to access the meter data directly from the data base of the Acuvim II. This acts a back logger for users if they need to access the meter data or if they ...Change CT Direction from Meter Settings 1312
AcuRev 1310 – Changing the CT Direction from the Meter Settings This document provides users with a walkthrough on how to change the direction of the CT through the meters settings. This setting change is performed from the AcuRev 1310 series meter ...